Developer Guide
Table of content
1. Introduction
1.1 Software Overview
1.2 Purpose
1.3 Scope
2. Setting up and getting started
3. Design
3.1 Architecture
3.2 Classes
3.2.1 Ui class
3.2.2 Parser class
3.2.3 Module class
3.2.4 Task class
3.2.5 TimeTable class
3.2.6 TaskList class
3.2.7 ProjectManager class
4. Implementation
5. Documentation and Dev-ops
Appendix A: Product Scope
Target user profile
Value proposition
Appendix B: User Stories
Appendix C: Non-Functional Requirements
Appendix D: Glossary
Appendix E: Instructions for manual testing
1. Introduction
1.1 Software Overview
CEGMods is a command line (CLI) application that helps computer engineering (CEG) students to manage their modules, tasks and projects.
CEGMods will allow students to categorize their tasks based on their modules and automatically help prioritize them by deadlines. It will also help students manage project deadlines by splitting them into mini-milestones.
1.2 Purpose
This document describes the architecture and software design of CEGMods. The goal of this document is to cover the high-level system architecture and design.
The document is divided into three main parts: design, implementation and documantation. The design includes the architecture diagram and the introduction of each class. The implementation describes some details on how certain features are implemented. The documentation details the logging, testing and configuration of CEGMods. It also includes the requirement and the instructions for manual testing in the appendices.
1.3 Scope
The intended audience of this document is the developers, designers, and software testers of CEGMods.
2. Setting up and getting started
Setting up the project in your computer
<font color=#FF5733>Caution: </font> <font color=#00000><font color=#00000> Please follow each steps in the guide carefully. </font>
Before you start:
Please ensure you have Java 11 installed in you computer.
- Fork this repo from this link
- Clone the fork to your own computer. You are highly recommended to use Git tool (like Sourcetree) to track your work.
-
Use your own IDEA to program. You are highly recommended to use IntelliJ IDEA. Please check whether you have correct JDK version (JDK 11) in your computer and congiure the JDK.
If you are using IntelliJ IDEA:
- Open IntelliJ
- Set up JDK 11 for Gradle
- Click
Configure->Project Defaults->Project Structure - Click
New...and set it to the directory of the JDK 11 installed
- Click
- Import the project as a Gradle project.
<font color=#FF5733>Note: </font> <font color=#00000> It is different from importing a normal Java project.</font>
If you are using IntelliJ IDEA:
- Click
Import Project(orOpen or Importin newer version of Intellij). - Locate the
build.gradlefile (not the root folder as you would do in a normal importing) and select it. ClickOK. - Click
OKto accept the default settings but do ensure that the selected version ofGradle JVMmatches the JDK being used for the project. - Wait for importing process to complete
- Click
- Do the testing. Please follow the testing guide
3. Design
3.1 Architecture
The Class diagram given below shows the interaction between major classes, and explains the structure of the software system.
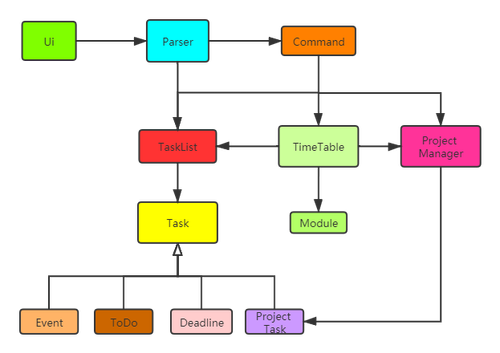
3.2 Classes
The CEGMods consists of six classes:
MainUiParserModuleTaskTimeTableStorageProjectManager
3.2.1 Ui class
The Ui class reads the user’s input and response relevant messages. It also contains the welcome message and help message to help the user navigate the
3.2.2 Parser class
The Parser class deals with making sense of the user’s command and execute the command relevantly:
- add new
ModuleintoTimetable. - delte
ModulefromTimetable. - add new
Taskinto tasklist. - delete
Taskfrom tasklist. - print out
Timetableof a certain day or one week.
3.2.3 Module class
The Module class contains the information of a module, including the title, description, and time slots of lectures, tutorials and labs.
3.2.4 Task class
The Task class contains the information of a task, including the todo, event and deadline tasks.
- add new
task - add
atorbyfor task - get
donestatus for task
3.2.5 TimeTable class
The Timetable class shows the timetable for all the module slots and tasks. It also stores Module details in an arraylist and checks whether there is a time conflict between two classes.
- print today
timetable - print weekly
timetable - print upcoming
deadline - view today’s
deadlineand time remaining - view this week’s
deadlineand time remaining - add
moduleintotimetable - check time conflict for
moduleandevent
3.2.6 TaskList class
- print the
tasklist - add
taskintotasklist - remove
taskfrommodule - print
todo list - print
event list - print
undone list - print
deadline list - clear past
deadline - delete
done task3.2.7 ProjectManager class
- print the
project tasklist - add
project taskintoproject tasklist - print
project progress4. Implementation
This section provides details on the implementations of certain features.
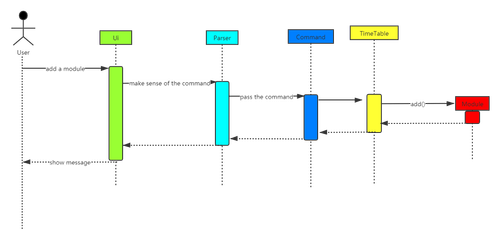
Feature: Add a module
The user type in command in module mod/<MODULE_CODE> lec/<LECTURE_DAY> <LECTURE_TIME> tut/<TUTORIAL_DAY> <TUTORIAL_TIME> lab/<LAB_DAY> <LAB_TIME> this form to add a module into the timetable. The time slot of lab is optional. The program will detect whether the user command is in this form, and store module data in arraylist modules in Timetable class after Ui passing command and calling addModule() in Parser class.
The sequence diagram below shows the interaction between these classes when the user adds a module.
Feature: Delete a module
The user enters the command: delete mod/<MODULE_CODE> to delete a module in the timetable. The Parser class will take this user command and pass it to Command class to enable the deleteModule() method in the TimeTable class.
Feature: Add a task
The user enters the command: todo <DESCRIPTION> to add a todo task in the tasklist.
The user enters the command: deadline <DESCRIPTION> /by <YYYY-MM-DD HH:mm> to add a deadline in the tasklist.
The user enters the command: event <DESCRIPTION> /at <YYYY-MM-DD HH:mm> to add an event in the tasklist.
The user enters the command: mod/<MODULE_CODE> ptask/<DESCRIPTION> by/<TIME_DESCRIPTION> to add a project subtask in the tasklist.
The Parser class will take the user command and pass it to the Command class to enable the addToDo/addDeadline/addEvent/addProjectTask/ method, and then call both addTask method in TaskList class and appendToFile method in Storage class to update the task list.
Feature: Delete a task
The user enters the command: delete task/<TASK_INDEX> to delete a task from the tasklist. The Parser class will take the user command and pass it to the Command class to enable the deleteTask method, and then call both the deleteTask method in TaskList class and deleteTaskFromFile method in Storage class to update the task list.
07e49575c71a4dca7fd8f90387972a09b5b874cc
Feature: Print task list
The user enters the command:
task listto view the task list. TheParserclass will take the user command and pass it to theTaskListclass to enable theprintListmethod.
Feature: View time table
The user enters the command: today timetable or this week timetable to view the the timetable. The Parser class will take the user command and pass it to the Command class to enable the printTodayTimetable or printWeeklyTimetable method, and then call printTodayTimetable or printWeeklyTimetable method in TimeTable class.
5. Documentation and Dev-ops
Documentation
Setting up and maintaining the project website:
- We use Jekyll to manage documentation.
- The
docs/folder is used for documentation. - To learn how set it up and maintain the project website, follow the guide [se-edu/guides] Using Jekyll for project documentation.
Style guidance:
- Follow the Google developer documentation style guide.
- Also relevant is the [se-edu/guides] Markdown coding standard.
Diagrams:
- See the [se-edu/guides] Using PlantUML.
Converting a document to the PDF format:
See the guide [se-edu/guides] Saving web documents as PDF files.
DevOps Guide
Making a release
Here are the steps to create a new release.
- Update the version number in Main.java.
- Generate a fat JAR file using Gradle (i.e., gradlew shadow).
- Tag the repo with the version number. e.g. v0.1
- Create a new release using GitHub. Upload the JAR file you created.
Build Automation
We use Gradle for tasks related to build automation, such as running tests, and checking code for style compliance.
To run all build-related tasks:
- Open a terminal in the project’s root directory.
- Run the command:
- Windows:
gradlew build - MacOS/Linux:
./gradlew build
- Windows:
- A message stating BUILD SUCCESSFUL will be shown in the terminal if all tasks run successfully. Otherwise, use the error report provided to resolve the issue before trying again.
Appendix A: Product Scope
Target user profile
This application is intended for users who
- are NUS Computer Engineering Students
- have a large variety of lesson (lab, tutorial, lecture, webcast) and commitment types (CCA, external commitments)
- have a certain type of homework based on standard formats (pre-lecture/ post-lecture/ pre-tutorial/ post-tutorial/ pre-lab/ post-lab)
- have various projects ongoing at the same time (individual, team, for technical modules and non-technical modules)
- are reasonably comfortable using CLI apps
Value proposition
- Manages Tasks based on:
- the module: eg. CS2113T, CG2271, CS2101 (can be colour-coded according to modules)
- tasks unrelated to modules can be placed under “others”
- the deadline of the task: eg.pre-lecture/ post-lecture/ pre-tutorial/ post-tutorial/ pre-lab/ post-lab
- urgency: a chronological list of what is due the earliest
- the amount of time taken for the task: range of 30min-3hours
- Manages Schedule based on:
- NUSMods schedule, ie. modules
- Webcast option, ie. can be shifted around
- Team meetings (regular scheduled and ad hoc)
- Manages Project based on:
- Deadlines of subtasks (subclass of task but for projects)
- Percentage of completion
Appendix B: User Stories
| Priority level| As a/an | I want to | so that I can | ——– | ——– | ——– |——– | | must-have | new user | add my modules |I can categorise my tasks and schedule |must-have | new user|add my lecture slots|I can plan my timetable |must-have|new user|add tutorial slots|I can plan my timetable |must-have|user|add lab slots|I can plan my timetable |must-have|user|view my timetable |I can go about my day following the planned timetable |nict-to-have|user|view my project progress|I can manage my project |must-have|user|add subtasks of project |I can divide whole project in various subtasks and record them |nice-to-have|user|create daily or weekly to-do list |I can view all the tasks to be completed |must-have|user|add deadline to tasks(assignment, tutorials)|I can know when to complete |must-have|user|prioritize tasks in to-do list by urgency level|I can plan what to do first |must-have|user|mark tasks as done or delete them| |nice-to-have|user|add alarm to remind the upcoming event|I won’t forget or miss relevant events |nice-to-have|user|add periodic zoom links for online lectures/tutorials|I can join the zoom session quickly before the class |nice-to-have|user|share project schedule and details with teammates|I can cooperate with my teammate better
Appendix C: Non-Functional Requirements
The following statements describe the non-functional requirements for the application:
- CEGMods should be able to work on any mainstream OS which has Java 11 or a higher version of Java installed.
- The system should not take more than 5s to run for every command.
- The user is expected to have a basic idea about the modules in NUS.
- A user comfortable with faster typing speed than average should be able to use this program with ease.
Appendix D: Glossary
- Mainstream OS: Windows, Linux, macOS
Appendix E: Instructions for manual testing
This portion contains instructions on how to perform manual testing.
- Running tests
- Types of tests
Running tests
There are two ways to run tests.
- Method 1: Using IntelliJ JUnit test runner
- To run all tests, you can click
src->test, right-click on thejavafolder and chooseRun 'Tests in 'tp.test'' - To run a subset of tests, you can click
src->test->javaand right-click on a test package, test class, or a test and chooseRun 'ABC'
- To run all tests, you can click
- Method 2: Using Gradle
- Click
Terminalto open a new console and type in the commandgradlew clean testto run a test (Mac/Linux: ./gradlew clean test) Types of tests - This project has 1 type of tests:- Unit testing:targeting the lowest level methods/classes. «««< HEAD
- Click
=======
07e49575c71a4dca7fd8f90387972a09b5b874cc